Single sign-on (OIDC)
Identity Provider (IdP) integration connects applications and services with an external identity provider for your organization. This enables centralized authentication and authorization management, improving security and simplifying user access. By leveraging IdP integration, you can ensure that users are securely authenticated and authorized to access various applications and services across your organization.
OpenEverest uses OpenID Connect (OIDC) Protocol to integrate with external Identity Providers (IdP).
To integrate an IdP with OpenEverest, configure OIDC on the IdP's side, then configure OpenEverest.
Configure OIDC on the provider side
-
Proof Key for Code Exchange (PKCE): When setting up the Provider side, it's important to configure an application specifically for PKCE authorization.
-
Redirect URIs:
-
Sign-in redirect URIs should point to
<EVEREST_URL>/login-callback. -
Sign-out redirect URIs should point to
<EVEREST_URL>.ImportantIdP providers often require a secure connection (HTTPS). Therefore, the provider might require your
<EVEREST_URL>to be based on HTTPS. If your provider requires this, consider adding a reverse proxy in front of OpenEverest to provide such functionality.
-
-
Refresh tokens: Allow the refresh token grant for the application, so that OpenEverest can keep users signed in. See Keep SSO users signed in.
-
ID token: OpenEverest reads the user from the ID token, so the IdP must sign it with an asymmetric key (for example RS256 or ES256), and put the
groupsclaim in it if you use group-based RBAC. See How sign-in works.
Example: OIDC configuration on the provider side
Below is an example of the configuration for the IdP provider Okta.
Other popular IdPs include Microsoft Azure Active Directory, Auth0, Google Identity Platform, etc.
OKTA
-
Sign in to your Okta organization as a user with administrative privileges.
-
In the Admin Console, go to Applications → Applications and click Create App Integration.
-
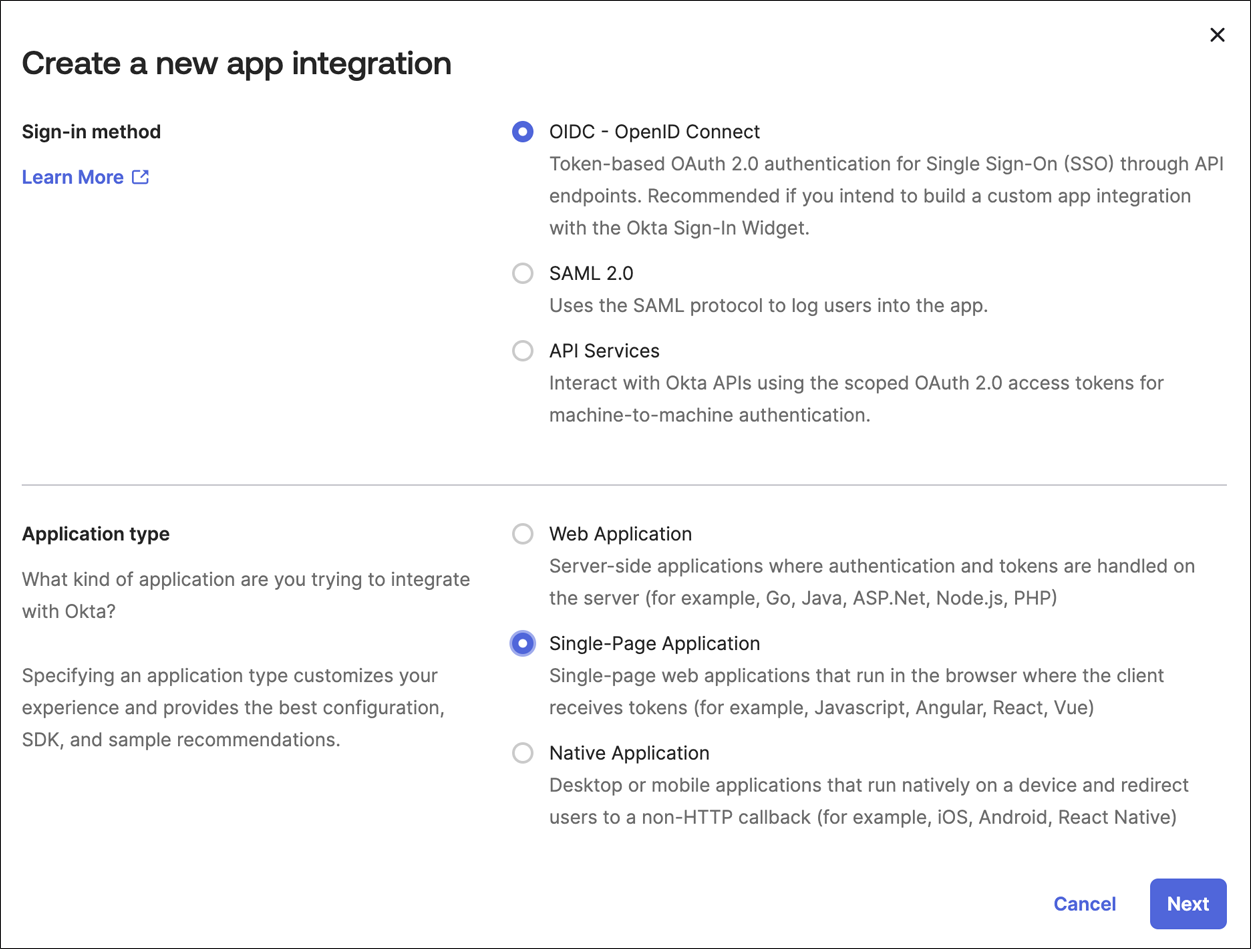
On the Create a new app integration page, set the following:
- Sign-in method - OIDC - OpenID Connect
- Application type - Single-Page Application, and click Next.
-
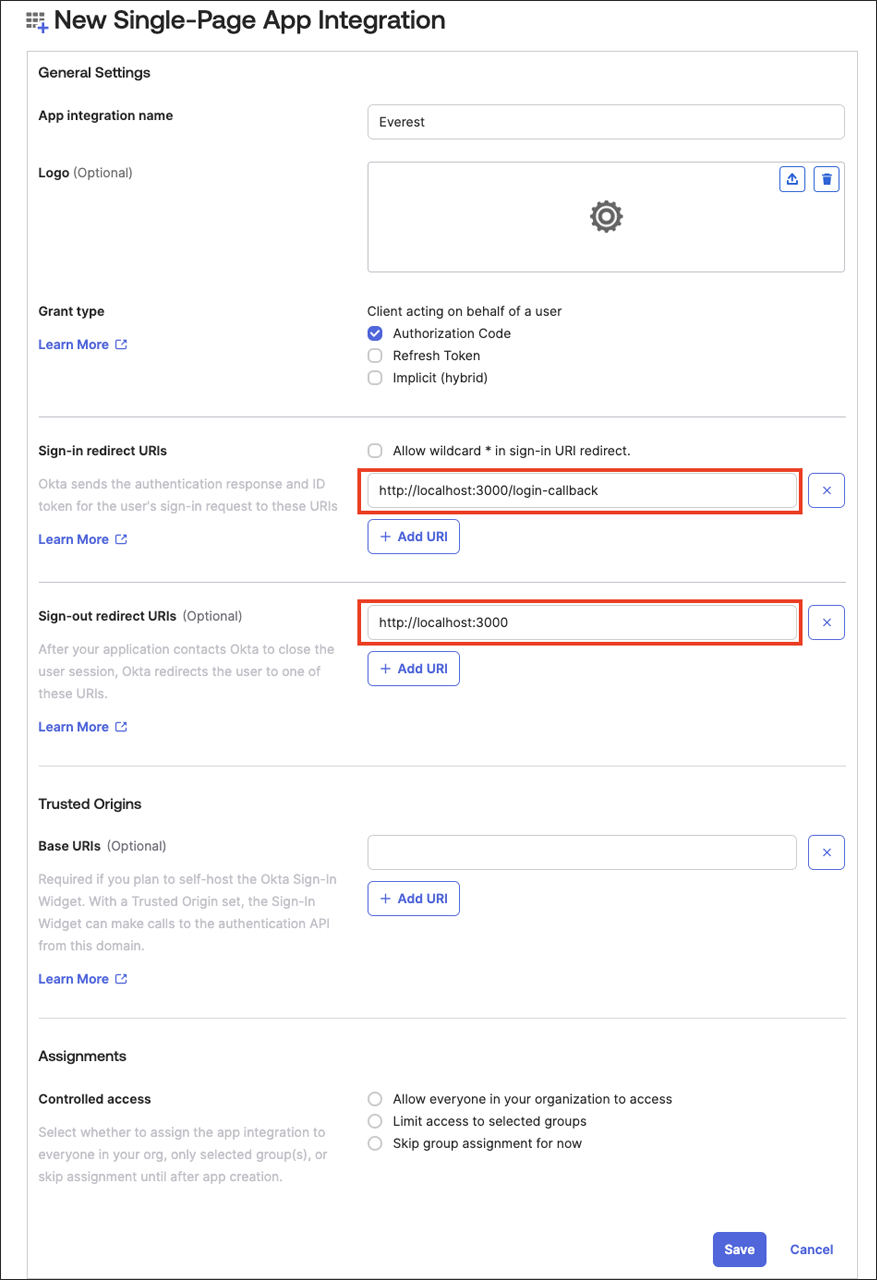
Set the following fields:
a. App integration name - any value
b. Sign-in redirect URIs -
<EVEREST_URL>/login-callbackc. Sign-out redirect URIs -
<EVEREST_URL>d. Grant type - select Refresh Token in addition to Authorization Code.
NoteOkta allows the use of HTTP for development purposes and in cases where the Admin explicitly permits it.
e. Click Save.
f. Copy the
clientIDof the created app.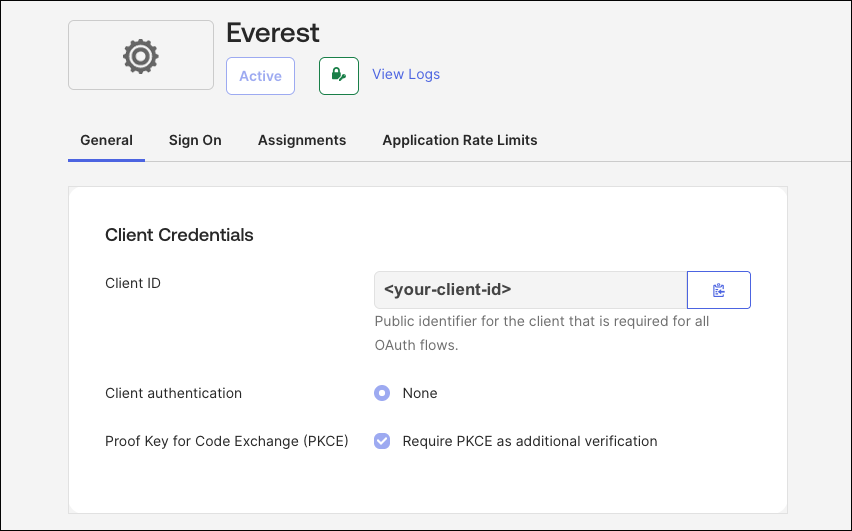
g. Navigate to Security → API → Authorization Servers and copy the
issuerURLyou’d like to use for the Everest authorization.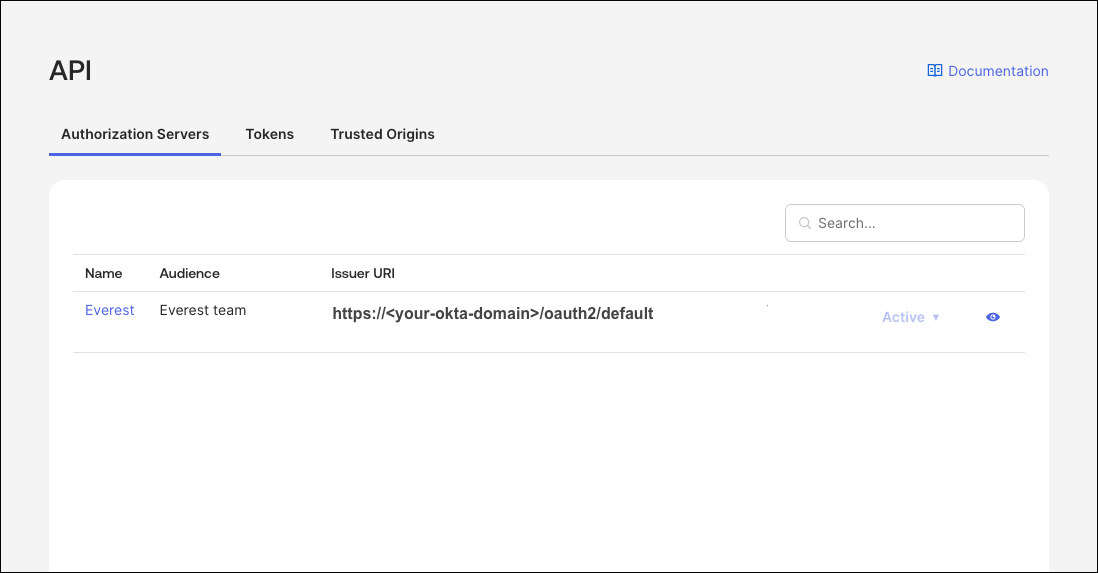 note
The values shown are for demonstration purposes only. Replace them with your actual Okta configuration.
Configure OpenEverest
OpenEverest needs the issuer URL of your IdP and the client ID of the application you created. Optionally, set the scopes to request; the default is openid, profile and email.
The configuration is stored in the everest-settings ConfigMap in the everest-system namespace. Use one of the following methods.
At installation, with Helm
helm install everest-core openeverest/openeverest \
  --version 2.0.0-alpha.1 \
  --namespace everest-system \
  --create-namespace \
  --set server.oidc.issuerUrl=https://example.okta.com \
  --set server.oidc.clientId=<client-id>
Helm writes everest-settings only on installation. To change the configuration later, use one of the other methods.
After installation, with kubectl
-
Edit the ConfigMap:
kubectl edit configmap everest-settings -n everest-systemdata:oidc.config: |issuerUrl: https://example.okta.comclientId: <client-id>scopes:- openid- profile- email -
Restart the server to apply the change:
kubectl rollout restart deployment/everest-server -n everest-system
After installation, with everestctl
everestctl settings oidc configure \
  --issuer-url=https://example.okta.com \
  --client-id=<client-id>
The command updates everest-settings and restarts the server for you. See Users for how to get everestctl for OpenEverest 2.
- Restarting the server affects only the OpenEverest UI and API. Instances keep running.
- The restart breaks existing
kubectl port-forwardsessions. Start them again.
Testing IdP integration
After setting up your OIDC configuration, you can verify the functionality by visiting the OpenEverest login page and attempting to log in using Single Sign-On (SSO).
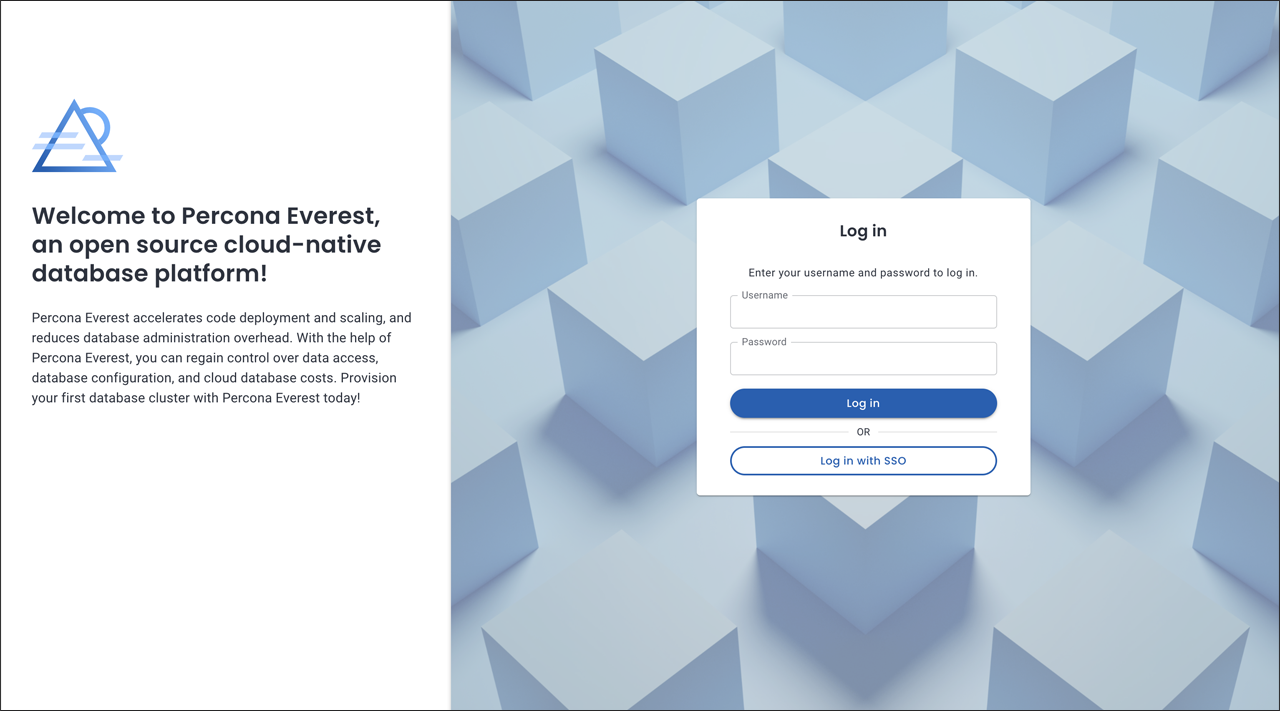
If OpenEverest can't use the OIDC configuration, for example because clientId is missing, it turns SSO off and the everest-server log says why. The server keeps running, so built-in users can still log in.
How sign-in works
- The UI signs the user in with the IdP, using the authorization code flow with PKCE.
- The UI sends the ID token it received to OpenEverest, which exchanges it for an OpenEverest access token. The exchange is an RFC 8693 token-exchange grant on
POST /v1/auth/token; see API. - The UI calls the API with the OpenEverest access token. The API accepts only tokens that OpenEverest issued; IdP tokens are refused.
OpenEverest accepts an ID token only if:
- it is signed with an asymmetric key from the IdP's published keys (JWKS). Tokens signed with a shared secret (
HS256) are refused — in Authentik, for example, give the provider a signing key; - its issuer (
iss) equals the configured issuer URL; - its audience (
aud) contains the configured client ID, and its authorized party (azp), when present, is the client ID; - it was issued in the last 5 minutes and has not expired.
Access tokens and the UserInfo endpoint are not used, because they don't prove which application they were issued to. IdPs that give the browser opaque access tokens, such as Auth0 and Authentik, work, because they still issue a JWT ID token.
The user's groups are read from the groups claim of the ID token only. Groups that the IdP puts only in the access token or in UserInfo are not seen. In Keycloak, for example, enable Add to ID token on the group mapper.
Keep SSO users signed in
An SSO session in OpenEverest lasts 15 minutes, the lifetime of the OpenEverest access token. When it expires, the OpenEverest UI renews it with your IdP in the background, without prompting the user, and exchanges the new ID token again. To do that, the UI needs a refresh token from the IdP. Without one, SSO users are signed out every 15 minutes.
To get a refresh token:
-
Allow the refresh token grant for the OpenEverest application in your IdP, for example Refresh Token in the grant types of the application in Okta or ZITADEL. Keycloak issues refresh tokens by default.
-
Add the
offline_accessscope to the OIDC configuration of OpenEverest, together with the other scopes you need:everestctl settings oidc configure \--issuer-url=<your-issuer-url> \--client-id=<your-app-client-id> \--scopes=openid,profile,email,offline_accessLike any change to the OIDC configuration, this restarts the OpenEverest server. Users get a refresh token the next time they sign in.
Each renewal exchanges a new ID token, so the IdP must include an id_token in its refresh token response. Keycloak, Auth0, Microsoft Entra ID, Okta and Google do when the openid scope was granted.
OpenEverest issues no refresh token of its own to SSO users, so the IdP stays in control: a user disabled in the IdP loses access when their OpenEverest access token expires, at most about 20 minutes later.
OpenEverest OIDC configuration for Microsoft Entra
Use the v2.0 issuer URL of your tenant. OpenEverest compares the issuer of every ID token with it, so the multi-tenant endpoints (common, organizations and consumers) don't work.
everestctl settings oidc configure \
--issuer-url=https://login.microsoftonline.com/<tenant-id>/v2.0 \
--client-id=<your-app-client-id>
Replace <tenant-id> with your directory (tenant) ID and <your-app-client-id> with your application (client) ID. The default scopes (openid, profile and email) are enough: OpenEverest validates the ID token, whose audience is your application, so the <your-app-client-id>/.default scope that older OpenEverest versions needed is not required.
To use group-based RBAC policies, add a groups claim to the app registration in Token configuration > Add groups claim. By default, Microsoft Entra lists groups by their object IDs, so use those IDs as group names in your RBAC policies.
For the limitations, see OIDC integration with Microsoft Entra.